Search This Blog

Friday, July 29, 2011

Ice Cream and the Importance of Timing


I've been seeing a ton of delicious looking ice cream recipes on the blogs I follow and they all seem to come from The Perfect Scoop by David Lebovitz. After a couple weeks I couldn't stand all this deliciousness going on without taking part anymore, so we ordered the book and an ice cream maker. With free Amazon Prime for students, we had our equipment in two days!

I saw the peach ice cream on Annie's Eats so we had bought some peaches to try that first. Unfortunately, there weren't any ripe peaches in the grocery store, so we bought some hard ones and put them in brown paper sacks to help them along. Last Saturday, when we had planned to make the ice cream they weren't perfectly ripe, but because they had softened up a bit we decided to go ahead anyway.

The ice cream was horrible. It was edible, but not pleasurable. Even with added sugar while mixing, we couldn't make up for the unripe peaches.

To recover from the peach disappointment, we turned to another stone fruit. We had bought some nectarines too, intending to eat them as a snack. Changing their purpose, we stuck them in paper bags to speed up their ripening for sorbet. Unfortunately this time we caught them too late. We've been really busy cleaning our old apartment and weren't able to get to the nectarines as soon as we intended. I gave them the benefit of the doubt and cut and cooked them as directed, but the resulting syrup was gross. We gave up before even putting them in the food processor.


The overripe nectarines- don't be fooled by their looks

We've learned our lesson. Unfortunately for fresh fruit ice cream the timeline can only be dictated by the fruit, not our schedule. There's all sorts of parallels to other parts of life besides ice cream, but I'll let you make your own applicable comparisons.

Luckily, someone invented the freezer! (Which is actually why I can make ice cream without trucking in ice in the first place.) With some handy frozen raspberries from ours, we made this lovely raspberry swirl and brownie ice cream from the book. It turned out quite wonderfully! The only thing we changed was the raspberry sauce. We added 3 tablespoons corn syrup and some sugar to taste to the raspberries as a substitute for vodka. The corn syrup helps the raspberry swirl to not harden as much, which is what the vodka was for.


If you're like us, you should definitely bake two batches or a double batch of the brownie recipe. Or else there won't be enough to go into the ice cream (we put in half a batch). If you have more self-control one batch should be fine.

We loved the raspberry brownie combination. It was the perfect balance of taste and timing. Ironically everyone we offered some to refused, but we've been more than happy to keep it to ourselves.

Wednesday, July 27, 2011

Summer Squash and Tomato Gratin

Edit: We revisited this recipe, and now I'd recommend skipping the milk. See here for the revised recipe.

This is a super easy and delicious way to use the wonderful produce we have so much of in Summer. Kyle took the lead on this recipe but he said I could still blog about it because it tasted so good!

We were originally going to make ratatouille and leave out the eggplant (since we didn't have any and don't particularly love it), but then we decided that a gratin sounded better to us last night. This dish was partially inspired by a gratin recipe from The Kitchn and partially inspired by a recipe from an America's Test Kitchen cookbook, which I love by the way. Although if you order it, go through Amazon because the ATK company takes like 4 weeks to ship!

So here's what we did:

Kyle washed and sliced 4 yellow and orange squash and 1 zucchini into thin coins using our food processor. The squash was a farmer's market find and the zucchini was from our really nice upstairs neighbor's garden. You can also slice them by hand or with a mandoline, but the food processor is awesome because it's so quick. We blanched and froze half the slices to use later, but you could use them all if you're cooking for more than two. Just be sure to use a bigger pan and increase the other ingredients.

Kyle spread some olive oil in a 9" square pan and tossed the sliced squash and zucchini with 2 tablespoons of olive oil. He layered a third of the squash and zucchini on the bottom and sprinkled salt and pepper over them. He then spread about 2 ounces mozarella on top. He then repeated the squash (+salt and pepper) and mozarella layers and topped it off with a final squash layer with more salt and pepper. I sprinkled on about a tablespoon dried basil and he drizzled on 1/4 cup milk. Then deciding it needed something more, we added some leftover chopped tomato and sliced another one and stuck that on top. I sprinkled it with about 2 teaspoons dried thyme (I really have no idea, I'm just estimating here. Put on whatever you think looks good.) and some more cheese. Prep only took about 10-15 minutes.

We baked it in the oven at 400 for 30 minutes uncovered. We then sprinkled about a quarter cup breadcrumbs on top and let it bake for 5 more minutes. We pulled it out, took a couple pictures and ate!

Man was it good! We both promptly decided that this is our new favorite way to have squash.  The tomatoes on top had roasted in the oven and their juices drained down and really gave the dish some deep flavor. I wouldn't change anything next time, except maybe I'd make more. (And possibly add mushrooms, parmesean, fresh herbs instead.... I'm really incapable of making the exact same recipe twice I think. But this didn't really need anything more, I just like experimenting.)


In summary, here's approximately what you need:

2-3 squash/ zucchini
6 oz mozarella (we used part-skim, but whatever you have works)
1 1/2 tomatoes
1/4 cup breadcrumbs (crushed croutons could substitute)
1/4 cup milk
1 tablespoon dried basil
2 teaspoons dried thyme
salt and pepper
2 tablespoons olive oil

This yields 4 servings

Feel free to play around with the ingredients and use whatever fresh summer produce you have on hand and whatever herbs and spices you like!

Cinnamon Rolls- Overnight or all at once


Cinnamon rolls are one of my favorite desserts. So much so that two years ago I went on a recipe hunt and tried hundreds (okay, maybe 6 or 8) to find my favorite.  I never reached cinnamon roll perfection, but this recipe is the best tasting and most consistent of those I tried. I solicited recipes from lots of friends and the winner was from my friend Jeff's grandma. 


I made them again a couple weeks ago when I was struck with a craving on a Saturday night for a cinnamon roll breakfast the next morning. I didn't really feel like waking up early on a Sunday morning though. Luckily, this awesome idea for overnight cinnamon rolls popped up in my google reader feed the day before, so that's what I did!


I was originally going to try a cinnamon roll recipe from the Pioneer Woman's blog, but I kind of failed at the first step. After accidentally doubling the milk (quart to cup conversions are apparently not my strong point) and scalding and cooling the milk/oil mixture I realized my vegetable oil was rancid. After wasting half a gallon of milk, I did Grandma Jackson's cinnamon rolls instead, because they used shortening and that hadn't gone bad.


Don't leave your yeast sitting in the warm water too long or this will happen:


The yeast used to be in the smaller of those two measuring cups, but it overflowed and we had to put it in the bigger one, and then that almost overflowed!

The only thing I did differently from the recipe for the dough was in the rising. I let it rise an hour that night (for quicker rising the next morning). In the morning I rolled the dough out in two batches and after cutting the rolls, I let them rise for about 30 minutes in an oven that had been heated to 200 F and then turned off. 

I never really follow a recipe for cinnamon roll filling. I just melt a stick of butter (I never said these were healthy) spread that on and then sprinkle as much sugar, brown sugar, and cinnamon as I think looks good. For the second batch of these I browned the butter with a vanilla bean and toasted some pecans for the filling. I wouldn't bother browning the butter again because the taste doesn't make it through the rest of the filling. 


Here's an idea of how much I put on:


If you've never rolled out and cut cinnamon rolls, here's a picture of what it should look like:


I used floss because I didn't feel like searching for my thread. 


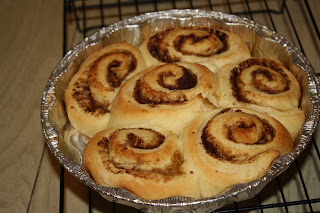
You want to bake this recipe until it's barely golden brown. These went a little too long, but were still tasty:


We baked them three rounds at a time. I put the frosting on right after I got them from the oven for two reasons. 1. It fills in all the cracks and crevices that way so you get uniform frosting goodness. 2. I can't wait much longer to eat them. I used cream cheese frosting for the rolls with normal filling and maple frosting for those with pecans. They both turned out pretty good, but I think the classic combination was my favorite. This made about 50 rolls for us, so if you don't have a voracious appetite or lots of nearby hungry friends, you can definitely halve it for still a decent amount.


Here's Grandma Jackson's recipe as she wrote it:


Grandma Jackson’s Cinnamon rolls

Dissolve 2 pkg yeast (2 scant Tbs) in ½ C. warm water with 1 Tbs sugar.  Scald 2 C milk and add 1 C shortening and 1 C sugar to hot milk; let cool.  Add yeast and 3 to 4 C flour to cool milk mixture.  Stir, then add 6 beaten eggs and 1 ½ tsp salt and about 6 to 8 C flour to make stiff dough.  (Too much flour makes very tough rolls.)  Let rise 30 minutes.

Roll out dough about ½” thick.  Spread with melted butter and sprinkle with 1 ½ C brown sugar mixed with 4 tsp cinnamon.  Sprinkle with chopped nuts and/or raisins and “roll er up!” Cut in 1” thick rounds and let rise on greased cookie sheet for about 1 ½ hours. (Leave 1” to 2” between rolls.)

Bake 350 for 15 minutes.
Frost with white icing
Makes about 3 dozen

Hint:  to slice rolled up dough into individual rolls cut it with a thread – just like you’ve seen me do it!


My cream cheese frosting:

1/2 stick butter
1/2 package cream cheese
4 cups powdered sugar
2 t vanilla
Milk to obtain your desired consistency (I used 2 Tbs)


My maple frosting:


1 stick of butter
4 cups powdered sugar 
1 t vanilla
2 t maple flavoring
milk to obtain your desired consistency (I used 4 Tbs)


One parting warning:


I wasn't able to finish all the pans before church, so one got stuck in the fridge and they kind of deflated: 


They still tasted good, but if you want pretty cinnamon rolls, don't stick them in the fridge after you've cut them.

Sunday, July 24, 2011

First Real Meal in Our New Apartment


Ok, we've been here a week, so this isn't really our first meal. The others weren't imaginary, but not actually satisfying either. That's expected when you're trying to get your kitchen back to a working state, but still frustrating. Well I guess ours is technically working, but not quite working well yet. Equipment locations in our new kitchen are still kind of a mystery, so cooking is a longer process than normal.

This pasta dish was inspired by a Bacon and Swiss Chard Pasta recipe on epicurious. Their picture looks much better than mine, but then they get paid for that. To make this recipe actually healthy, rather than fake healthy, you could skip the bacon and saute the onions in olive oil. The bacon route is pretty delicious though, so I'd go with reducing rather than eliminating it. Increasing the chard is an option, but we only got 12 stalks from the farmer's market since it's brand-new to us.

Here's what I did (with help from my awesome cooking partner and husband):

Pasta with Bacon and Chard

3/4 pound whole wheat linguine
8 ounces bacon
1/2 yellow onion, chopped
11 stalks Swiss Chard, stemmed and chopped (it would have been 12, but one went a little bad)
2 teaspoons balsamic vinegar (I'd do a full tablespoon next time)
1 tablespoon extra-virgin olive oil
2/3 cup grated part-skim mozarella (trying to make up for the bacon here)
1/8 teaspoon garlic powder (or 1 clove minced garlic)
salt and pepper to taste

Cook the linguine in well-salted boiling water until done. While draining the pasta, reserve one cup of the now starch-infused water for use later.

While the pasta is going, cook the yummy bacon in a large skillet until it is crisp. After the bacon is done, reserve 2 tablespoons of the fat (or less if you are feeling healthy) and drain the bacon on lots of paper towels. Saute the chopped onion in the bacon fat until it's tender and delicious looking; mine took about 5 minutes. Add garlic and saute until fragrant, about a minute or so.

Add the chard, oil, and salt and pepper to taste (see notes). After the chard has wilted nicely, 4 minutes or so, add the balsamic vinegar cook for one minute more. Take off the heat and toss in the pasta and cheese (yum!). Put in a lovely glass bowl, or a boring one like mine, and sprinkle bacon with a little cheese on top. That's why it looks so bacon-y: it's all on top. Put onto plates and enjoy!


Notes: Spinach or kale could stand in for chard.

I prefer a stainless steel skillet for this recipe so that you get the nice fond (burnt stuff stuck on the bottom, or the sauce from that) that'll help flavor your sauce, but nonstick would work as well.

It's always hard for me to add stuff to taste before it's done, so I'll give you my amounts. I added 1 teaspoon kosher salt, which worked well because of the salty bacon and pasta water. The 1 teaspoon pepper definitely wasn't enough, so we ended up sprinkling on more later. I'd go with a tablespoon next time, but that really depends on how much you like pepper. I kinda love it.

Also in full disclosure we didn't really add garlic until the end when realized it was missing something, but I think it would be better if it cooked in with everything else.


Thoughts: This was a nice change from our normal pasta fare and was pretty easy to make in just over half an hour, even in a new kitchen. Next time I'd experiment more with flavors like fresh herbs and add more swiss chard. Kyle said, "I agree."

So why this food blog? And other questions...


Why this food blog?
Good question. Basically I love food and people have started to notice my many Facebook posts about it. So, I figured I'd use this as the outlet for sharing my food adventures (and sometimes recipe cravings) and use Facebook more normally (whatever that means). Also, I try so many new recipes I have a hard time keeping track of ones I really love and which ones are only so so. This way I'll have a written memory and not some vague recollection of a really good blueberry lemon cake.

But don't you have another blog?
Yes, but that one's private. Although any of my friends and family can request an invitation, I wanted my food writings to be more accessible. And not bore all my relatives with tales of my latest cinnamon roll craze.

What food will I find here?

Mostly desserts (as you can tell from the blog header). Sugar and butter are my best friends. That may be a slight exaggeration, but only slight. And also, ironically, pretty healthy meals (most times). I don't get my eating habits either. Maybe I feel like if I eat pretty healthy most of the day it makes up for my baking addiction? Maybe...

Do I get to see pretty pictures?
I know a big draw of a lot of food blogs is the wonderful photography. I'm still very much in the developing stages of my saliva-inducing food styling and photographing ability. I'll be working to improve, but know that for now, it looks much better in real life!

Do you make your own recipes?
Sometimes. Mostly I use other much more skilled people's recipes. Often I substitute things and play with them. I'll always let you know my recipe source.


That's all for now! I'll be posting about my culinary adventures here including successful and failed attempts. If you want more, come back! Feel free to ask any more questions in the comments of this or any other post.